How to remove water spots by hand
#1
How to remove water spots by hand
Water spots are a very common problem for automotive finishes and the tricky part is removing them without instilling swirls and scratches back into the paint at the same time. So letís take a look at how to remove water spots by hand.
First you need to determine which type of water spots you have,
Step by Step Procedures for removing Type I Water Spots by Hand
Different types of water spots are removed differently, so itís important to try to diagnose which type of water spot you have first as this will help you understand the removal process and products and tools needed. The easiest type of water spots to remove are Type I and the most difficult to remove are Type II and Type III
Pictures
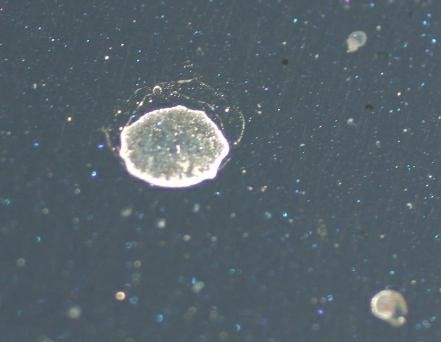
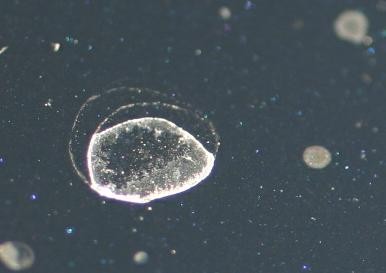
Type I Water Spots
Type II Water Spots
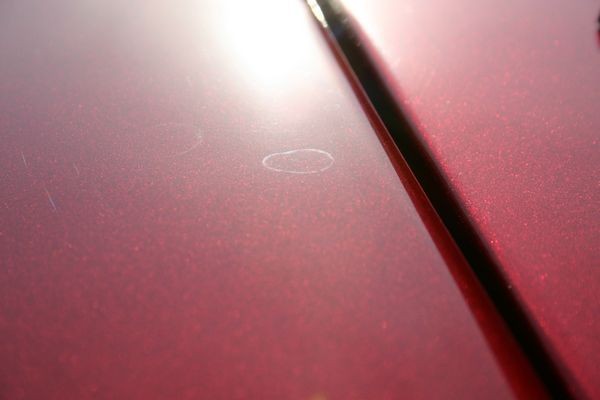
I took this photo myself when I helped Alex Fong from Corvette Forum remove a zillion Type II Water Spots out of the clear coat finish on his Corvette.
Photo Courtesy of MeguiarsOnline.com
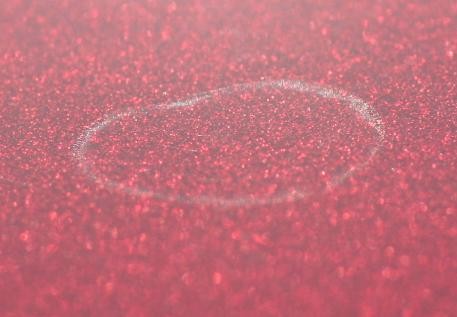
Here's a close-up of the same photo, if you look closely you can see the edges are angled downward as this is an actual etching "into" the clear paint.
Type III Water Spots
How to remove water spots by hand
Step-1 Wash and dry vehicle
Thoroughly wash and dry your carís finish and in most cases any topical water spots/mineral deposits will loosen and then rinse off, this is key because you want to remove as much of any mineral deposits or other physical contaminants off the paint so you can then see what remains and will need more attention in order to remove. You also donít want to rub any mineral deposits or other related particles over the paint so washing and drying is the first step.
Step 2 - Inspect the paint visually and physically
After you have washed and dried the vehicle, next visually inspect the paint and physically inspect the paint.
After inspecting the paint, if you still see and feel water spots youíre your carís finish, and youíre fairly certain these water spots are mineral deposits left by hard water, then itís possible a simple solution of vinegar gently wiped over the paint will remove them or most of them.
Hard water is water that has a high concentration of dissolved minerals, mainly magnesium and calcium. The acid in vinegar can help to break the bond between the minerals and the paint so the minerals will wipe or wash off. If you want to try the vinegar approach, itís important to first wash and dry the car so that normal loose dirt is removed so you donít grind it into the paint when wiping the paint with vinegar solution.
Step 3 Ė Clay the paint using detailing clay
If after the above, washing and drying, and/or giving the paint an acid bath, if you still see and feel water spots on the paint then the next step will be to try to remove them using detailing clay. Claying removes above surface bonded contaminants and this includes any mineral deposits or other physical particulates left on the surface from water spotting.
Remember that because these minerals will tend to be hard particles, itís important to knead your clay often to expose a fresh working side to clay with.
Video How to use detailing Clay
Step 4 Ė Use a hand applied compound, polish or paint cleaner
After claying, if you still see marks in the paint where the water spots were previously, this is common and a sign that the water spots have actually etched the paint (to some level), and the way to remove these marks or impressions is to gentle abrade the paint with a compound, polish or paint cleaner.
Because these etchings are below the surface, clay will not remove them because detailing clay only remove contaminants bonded onto the top of the surface.
The way you remove below surface defects is you gently abrade the paint in an effort t level the surface. To remove below surface defect by hand youíll need a clear coat safe compound, polish or paint cleaner. Some paint cleaners are non-abrasive in that they do not contain any ingredients with the intended purpose of physically abrading the surface. If the marks left behind in the paint are very shallow, sometimes a light paint cleaner, with the help of your applicator pad and a little passion behind the pad can remove faint marks. How hard or soft, the paint is will also a huge factor as to how easy or difficult it is to remove the water spot marks.
Product Options for removing light or shallow water spot marks
Usually the type of etching or mark left by a Type I Water Spot is very shallow so they are fairly easy to remove. So in keeping with the philosophy of,
"Use the least aggressive product to get the job done"
There are two groups below, the first group of products would be considered the least aggressive product to consider starting with, if the water spots are more serious than shallow, light, slight marks or impressions in the paint, then consider one of the more aggressive products in the Compound and Polish category.
How to remove Type II Water Spots by Hand
Type II Water Spots are etchings or craters in the paint and neither detailing clay nor vinegar is going to remover these types of below surface defects.
To remove a Type II Water Spot by hand follow Step 4 above after first washing, drying and claying the vehicle.
Note: Even though claying wonít remove Type II Water Spots, before hand or machine applying any type of paint care product to an automotive finish the car needs to be washed, dried and clayed as a ďBest PracticeĒ. Claying is the most effective way to remove above surface bonded contaminants and this should always be done before polishing if a physical inspection reveals the paint needs to be clayed.
How to remove Type III Water Spots Hand
Type III Water Spots are usually faded spots on single stage paints but can sometimes be milky looking spots on clear coat paint systems.
When it comes to removing Type II water Spots the limiting factor is how deep the spot penetrates into the actual film build of the top coat. You remove Type III Water Spots in the same manner you remove Type II Water Spots but if the fading or staining goes too deep you wonít be able to completely remove it safely.
To remove a Type III Water Spot by hand follow Step 4 above after first washing, drying and claying the vehicle.
On older single stage paints, because these types of paints are very porous can easily have a stain penetrate fairly deep into the paint and completely removing deep defects is always risky, so use caution.
For antique single stage paints, I always recommend pre-treating the paint with #7 Show Car Glaze to in essence put some oils back into the paint and thereby refreshing the paint and making it more workable or polishable. Plus the oils will help to restore rich color and counter the fading, whitening effect.
Seal the paint with a coat of beauty and protection
After removing the water spots to your satisfaction it's important to apply a coating of wax or a paint sealant.
By there very nature, compounds, polishes and paint cleaners don't provide any protection like you think of when you think of a car wax or paint sealant so be sure to apply either a coat of a quality wax or paint sealant to lock in the shine and restore a show room new finish.
Normally after pre-cleaning paint with some type of compound, polish, or paint cleaner you would use a finishing wax or finishing paint sealant and not a cleaner/wax or cleaner/sealant. Here's a list of all the different types of waxes and sealants at Autogeek.net
How To Choose The Right Wax or Paint Sealant for your Detailing Project
Further Resources
Applicator Pads (for applying paint cleaners)
CCS Red Wax/Sealant Applicator Pads 2 Pack
CCS Euro Foam Hand Polish Applicators
Wolfgang Polishiní Pal Combo
Wolfgang German Polish Ní Wax Applicator
Microfiber Towels (for removing paint cleaner residue)
Cobra Microfiber Products
If you find the idea of trying to rub out an entire car by hand a daunting task, then consider stepping up to a machine polisher, all of the polishers listed below are easy to learn how to use and master like a Pro and Autogeek is here to help see you through to success on whatever your detailing project might be...
Electric Dual Action Polishers
Porter Cable 7424XP
Meguiarís G110v2
Griotís Garage 6Ē ROP
Flex 3401 VRG
Cyclo Dual Head Orbital Polisher
An overview with demonstrations of the Porter Cable 7424XP, Meguiar's G110v2, Griot's Garage 6" Random Orbital Polisher, Griot's Garage 3" Mini Polisher, Flex 3401, Flex 603, Flex 3403, Cyclo Polisher, Makita 9227C, DeWalt 849,
Water spots are a very common problem for automotive finishes and the tricky part is removing them without instilling swirls and scratches back into the paint at the same time. So letís take a look at how to remove water spots by hand.
First you need to determine which type of water spots you have,
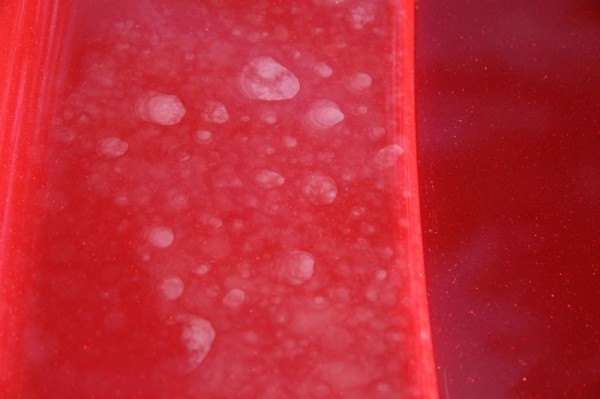
Type I Water Spots
Type I Water Spots are primarily a mineral or dirt deposit laying on the surface of paint. Type I Water Spots can be the results of minerals suspended in city water or well water that are left behind after the water evaporates off the finish. This can happen by washing a car but not drying the water off the paint or if a sprinkler goes off next to the car covering the car with water drop that are not dried off the paint. Type I Water Spots can also be dirt or pollution particles left behind after water from rain or inclement weather evaporates of the finish. Type I Water Spots can also be Type II Water Spots in that the water can leave both a deposit on the surface and an etching in the finish. Another way people describe mineral deposits is to refer to them has Hard Water spots, or spot left by ďhard water.
Type II Water Spots
Type II Water Spots are actual etchings or craters in the paint because something corrosive in a water source has landed on the paint and was not removed before a portion of the paint was eaten or dissolved by the corrosive substance.
Type III Water Spots
Type III Water Spots are spots that look faded or dull and are found primarily found on single stage paints after a water source lands on and then pools on the paint and is usually left to dwell on the surface for some measure of time before it evaporates or is wiped-off the surface. Type III Water spots can also happen to clear coat finishes too but itís not as common because I Type III Water Spot is either a stain or fading. Clear coats donít stain as easily as single stage paints because they are not as porous or permeable. Clear coats canít technically fade because they are clear to start with, thereís no color to fade.
Step by Step Procedures for removing Type I Water Spots by Hand
Different types of water spots are removed differently, so itís important to try to diagnose which type of water spot you have first as this will help you understand the removal process and products and tools needed. The easiest type of water spots to remove are Type I and the most difficult to remove are Type II and Type III
Pictures
Type I Water Spots


Type II Water Spots
I took this photo myself when I helped Alex Fong from Corvette Forum remove a zillion Type II Water Spots out of the clear coat finish on his Corvette.
Photo Courtesy of MeguiarsOnline.com

Here's a close-up of the same photo, if you look closely you can see the edges are angled downward as this is an actual etching "into" the clear paint.

Type III Water Spots

How to remove water spots by hand
Step-1 Wash and dry vehicle
Thoroughly wash and dry your carís finish and in most cases any topical water spots/mineral deposits will loosen and then rinse off, this is key because you want to remove as much of any mineral deposits or other physical contaminants off the paint so you can then see what remains and will need more attention in order to remove. You also donít want to rub any mineral deposits or other related particles over the paint so washing and drying is the first step.
Step 2 - Inspect the paint visually and physically
After you have washed and dried the vehicle, next visually inspect the paint and physically inspect the paint.
Visual Inspection
Often times Type I Water Spots will leave an impression in the paint, itís usually very slight but visually noticeable. Florescent lights and sunlight are usually very good at highlighting subtle water spot impression left behind in the paint. Also note I used the word ďinĒ when I described these water spot impressions, this is key because these impression are a type of etching or mark ďinĒ the paint and that means in order to remove the impression youíre going to have to use a product that abrades the paint.
Physical Inspection
Next physically inspect the paint and you do this by feeling the surface with your clean hand. Often times your hands can detect what you eyes cannot see, so feel the paint with your clean hand, the paint should feel smooth and glassy, if you feel a textured surface then chances are good that not all of the mineral deposits were removed by washing.
Optional - Acid Bath = Distilled White VinegarOften times Type I Water Spots will leave an impression in the paint, itís usually very slight but visually noticeable. Florescent lights and sunlight are usually very good at highlighting subtle water spot impression left behind in the paint. Also note I used the word ďinĒ when I described these water spot impressions, this is key because these impression are a type of etching or mark ďinĒ the paint and that means in order to remove the impression youíre going to have to use a product that abrades the paint.
Physical Inspection
Next physically inspect the paint and you do this by feeling the surface with your clean hand. Often times your hands can detect what you eyes cannot see, so feel the paint with your clean hand, the paint should feel smooth and glassy, if you feel a textured surface then chances are good that not all of the mineral deposits were removed by washing.
After inspecting the paint, if you still see and feel water spots youíre your carís finish, and youíre fairly certain these water spots are mineral deposits left by hard water, then itís possible a simple solution of vinegar gently wiped over the paint will remove them or most of them.
Hard water is water that has a high concentration of dissolved minerals, mainly magnesium and calcium. The acid in vinegar can help to break the bond between the minerals and the paint so the minerals will wipe or wash off. If you want to try the vinegar approach, itís important to first wash and dry the car so that normal loose dirt is removed so you donít grind it into the paint when wiping the paint with vinegar solution.
Step 3 Ė Clay the paint using detailing clay
If after the above, washing and drying, and/or giving the paint an acid bath, if you still see and feel water spots on the paint then the next step will be to try to remove them using detailing clay. Claying removes above surface bonded contaminants and this includes any mineral deposits or other physical particulates left on the surface from water spotting.
Remember that because these minerals will tend to be hard particles, itís important to knead your clay often to expose a fresh working side to clay with.
Video How to use detailing Clay
Step 4 Ė Use a hand applied compound, polish or paint cleaner
After claying, if you still see marks in the paint where the water spots were previously, this is common and a sign that the water spots have actually etched the paint (to some level), and the way to remove these marks or impressions is to gentle abrade the paint with a compound, polish or paint cleaner.
Because these etchings are below the surface, clay will not remove them because detailing clay only remove contaminants bonded onto the top of the surface.
The way you remove below surface defects is you gently abrade the paint in an effort t level the surface. To remove below surface defect by hand youíll need a clear coat safe compound, polish or paint cleaner. Some paint cleaners are non-abrasive in that they do not contain any ingredients with the intended purpose of physically abrading the surface. If the marks left behind in the paint are very shallow, sometimes a light paint cleaner, with the help of your applicator pad and a little passion behind the pad can remove faint marks. How hard or soft, the paint is will also a huge factor as to how easy or difficult it is to remove the water spot marks.
Product Options for removing light or shallow water spot marks
Usually the type of etching or mark left by a Type I Water Spot is very shallow so they are fairly easy to remove. So in keeping with the philosophy of,
"Use the least aggressive product to get the job done"
There are two groups below, the first group of products would be considered the least aggressive product to consider starting with, if the water spots are more serious than shallow, light, slight marks or impressions in the paint, then consider one of the more aggressive products in the Compound and Polish category.
How to remove Type II Water Spots by Hand
Type II Water Spots are etchings or craters in the paint and neither detailing clay nor vinegar is going to remover these types of below surface defects.
To remove a Type II Water Spot by hand follow Step 4 above after first washing, drying and claying the vehicle.
Note: Even though claying wonít remove Type II Water Spots, before hand or machine applying any type of paint care product to an automotive finish the car needs to be washed, dried and clayed as a ďBest PracticeĒ. Claying is the most effective way to remove above surface bonded contaminants and this should always be done before polishing if a physical inspection reveals the paint needs to be clayed.
How to remove Type III Water Spots Hand
Type III Water Spots are usually faded spots on single stage paints but can sometimes be milky looking spots on clear coat paint systems.
When it comes to removing Type II water Spots the limiting factor is how deep the spot penetrates into the actual film build of the top coat. You remove Type III Water Spots in the same manner you remove Type II Water Spots but if the fading or staining goes too deep you wonít be able to completely remove it safely.
To remove a Type III Water Spot by hand follow Step 4 above after first washing, drying and claying the vehicle.
On older single stage paints, because these types of paints are very porous can easily have a stain penetrate fairly deep into the paint and completely removing deep defects is always risky, so use caution.
For antique single stage paints, I always recommend pre-treating the paint with #7 Show Car Glaze to in essence put some oils back into the paint and thereby refreshing the paint and making it more workable or polishable. Plus the oils will help to restore rich color and counter the fading, whitening effect.
Seal the paint with a coat of beauty and protection
After removing the water spots to your satisfaction it's important to apply a coating of wax or a paint sealant.
By there very nature, compounds, polishes and paint cleaners don't provide any protection like you think of when you think of a car wax or paint sealant so be sure to apply either a coat of a quality wax or paint sealant to lock in the shine and restore a show room new finish.
Normally after pre-cleaning paint with some type of compound, polish, or paint cleaner you would use a finishing wax or finishing paint sealant and not a cleaner/wax or cleaner/sealant. Here's a list of all the different types of waxes and sealants at Autogeek.net
How To Choose The Right Wax or Paint Sealant for your Detailing Project
Further Resources
Applicator Pads (for applying paint cleaners)
CCS Red Wax/Sealant Applicator Pads 2 Pack
CCS Euro Foam Hand Polish Applicators
Wolfgang Polishiní Pal Combo
Wolfgang German Polish Ní Wax Applicator
Microfiber Towels (for removing paint cleaner residue)
Cobra Microfiber Products
If you find the idea of trying to rub out an entire car by hand a daunting task, then consider stepping up to a machine polisher, all of the polishers listed below are easy to learn how to use and master like a Pro and Autogeek is here to help see you through to success on whatever your detailing project might be...
Electric Dual Action Polishers
Porter Cable 7424XP
Meguiarís G110v2
Griotís Garage 6Ē ROP
Flex 3401 VRG
Cyclo Dual Head Orbital Polisher
An overview with demonstrations of the Porter Cable 7424XP, Meguiar's G110v2, Griot's Garage 6" Random Orbital Polisher, Griot's Garage 3" Mini Polisher, Flex 3401, Flex 603, Flex 3403, Cyclo Polisher, Makita 9227C, DeWalt 849,
Part 1 - How To Pick the Right Car Polisher for your Detail Project
Part 2 - How To Pick the Right Car Polisher for your Detail Project
Thread
Thread Starter
Forum
Replies
Last Post
howmany
General Tech
0
01-10-2013 01:24 AM


